STEM Activity - Building a Plow for Snow or Gardening
Creative STEM building activity using Legos and common materials to build a plow.
Materials
- Several Empty bathroom tissue rolls
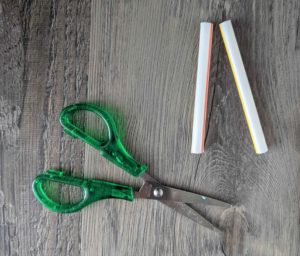
- Rubber bands, tape, scissors, straws, paper clips, etc.
- Legos to build a vehicle or a toy truck
- Any other matierials that might help build a plow
Instructions
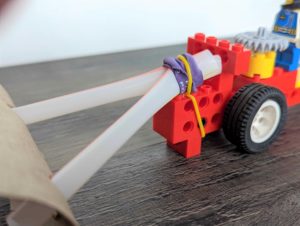
- Build a Lego vehicle, if not using a toy truck. Think about where the plow will be attached. This is where it gets challenging because the plow has to rest on the ground. This means it has to be attached to the vehicle at just the right angle. We used Lego rubber bands and regular rubber bands to make the attachment.
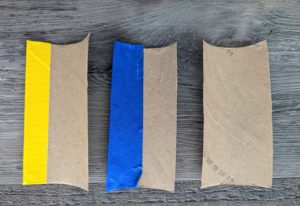
- Fashion the plow blade by cutting an empty bathroom tissue roll lengthwise. You might need to cut some off the bottom.

- Trim each end of the half-roll. If it is left as is, there is too much curve to the"plow blade."
- Do you need to reinforce your blade in anyway? Try reinforcing with different types of tape. We used painter's tap and duct tape. We also made blades that were not reinforced.
- Construct“arms” to hold the blade. You can use a straw cut into two pieces.
- Attach the arms to the blade. One option is to cut SMALL slits in the blade and fold in the end of the straw to push it through the slid. You'll want a tight fit so the arms don't easily slip out while the plow is in operation.
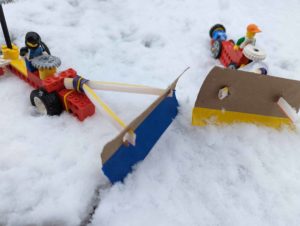
- Now it's time to test your plow! If this is a plow to use on soil, take it outside and test. Or if it's a snow plow, use one of the 3 fake snow recipes found here: https://thehomeschoolscientist.com/fake-snow-stem-experiment/

- We had fresh snow, so took our plows out. The edge of the blades did well in the wet snow since they were "waterproofed" with the tape. But, pushing snow was tough on the ground; it was easier on the picnic table.