

Groundhog Day Science Activities and Printable


Groundhog Day is the perfect excuse to sneak science into your winter homeschool or classroom routine, and these groundhog day science activities and printable do exactly that. From exploring how groundhogs hibernate and the underground homes they build to learning about their life cycle, diet, and daily behaviors, this mini unit blends real animal science with hands-on STEM fun. You’ll find simple experiments, build-it challenges, and an easy free printable to keep learning interactive, low-prep, and actually enjoyable for everyone involved.

The Groundhog Day science activities include designing and building a burrow, measuring shadows (which is a perfect activity for teaching children about the angle of the Sun throughout the day and the seasons), light, food webs and food chains, and more. It’s definitely a STEM packed resource.
If you have preschoolers and kindergarteners, add to this science study with some the low-prep literacy and math fun in this groundhog printable pack. It’s a fun, flexible addition that supports early literacy, fine motor skills, number sense, and seasonal observation alongside our Groundhog Day STEM activities.
So, let’s jump in and learn more groundhog science facts and then dig into the science activities. We do have an 80+ page groundhog science printable lesson you can download for free. (Information is below.)
Groundhogs are medium-sized mammals found in North America. They are also known as woodchucks, whistle pigs, or land beavers. Their scientific name is Marmota monax, and they belong to a group of animals called marmots.
Some people call them whistle pigs because when they become frightened, they make a high-pitched whistle to warn the colony.Groundhogs have round, sturdy bodies covered in brownish-gray fur. They have short legs, strong shoulders, and sharp claws that make them excellent diggers.

An adult groundhog is usually 16–20 inches long and weighs 4–9 pounds, which is about the size of a small house cat.
A groundhog’s front teeth are self-sharpening. The front of each tooth is harder than the back. When they chew, the softer part of the tooth wears down faster. This keeps the teeth naturally sharp, like built-in chisels.
Their teeth are orange on purpose. That orange color comes from iron in the enamel, which makes their teeth extra strong.

A groundhog’s front teeth are self-sharpening. The front of each tooth is harder than the back. When they chew, the softer part of the tooth wears down faster. This keeps the teeth naturally sharp, like built-in chisels.
More facts about a groundhog’s teeth:
- Their front teeth are called incisors. Your front four top and bottom teeth are called incisors, too!
- A groundhog’s front teeth never stop growing, so they must constantly chew on plants and bark to keep their teeth worn down.
- A groundhog’s front teeth are self-sharpening. The front of each tooth is harder than the back, so when they chew, the softer part wears down faster. This keeps the teeth naturally sharp.
- The iron in their teeth strengthens the teeth and makes it less likely to break when they are chewing on wood or attacking a predator.
- If a predator gets too close, a groundhog can bite hard enough to cause some injury. The iron in their teeth makes those bites hurt! They use these bites to give themselves time to escape down into their burrow.
While your little ones are learning about groundhogs, add some dramatic play with these adorable groundhog masks. They would be fun to wear while working on their burrow STEM challenge.
Groundhog Science Activities and Lesson Printable
There are so many more fun facts and activities in our free lesson printable (over 80 pages). This resource can be used with multiple ages. Activities cover groundhog biology, habitat, burrows, and more.
Your children will also learn about light and shadows, what makes day and night, and what causes our seasons. All of the things related to Groundhog Day. 🙂
We’ve included our lesson on food chains and food webs. It works well with this animal study and many others. So, reuse it when studying lizards, bears, birds of prey, and more.
The sponsor for our groundhog printable is CTCMath. Many thanks to them because for helping us keep this resource free to our community members and visitors. When you request this free printable, you are subscribing to both the THSS and CTCMath email communities.
Download our free groundhog science lesson printable.
Groundhog Science: Habitat and Burrows
Groundhogs are found across most of the eastern United States, parts of Alaska, and across Canada.
They prefer open areas like fields, meadows, and the edges of woodlands. You won’t find them in dense forests or deserts.

Groundhogs dig amazing homes! Their home is called a burrow.
They are expert diggers and create underground burrows with separate areas for sleeping, raising babies, and even a bathroom area! Burrows often have multiple entrances to quicly escape predators.
Burrows are an example of animal engineering. The different chambers help them organize important needs like sleeping, storing food, and escaping danger.
The burrow has different rooms called chambers, each used for a different purpose. Can you find these chambers in the drawing?
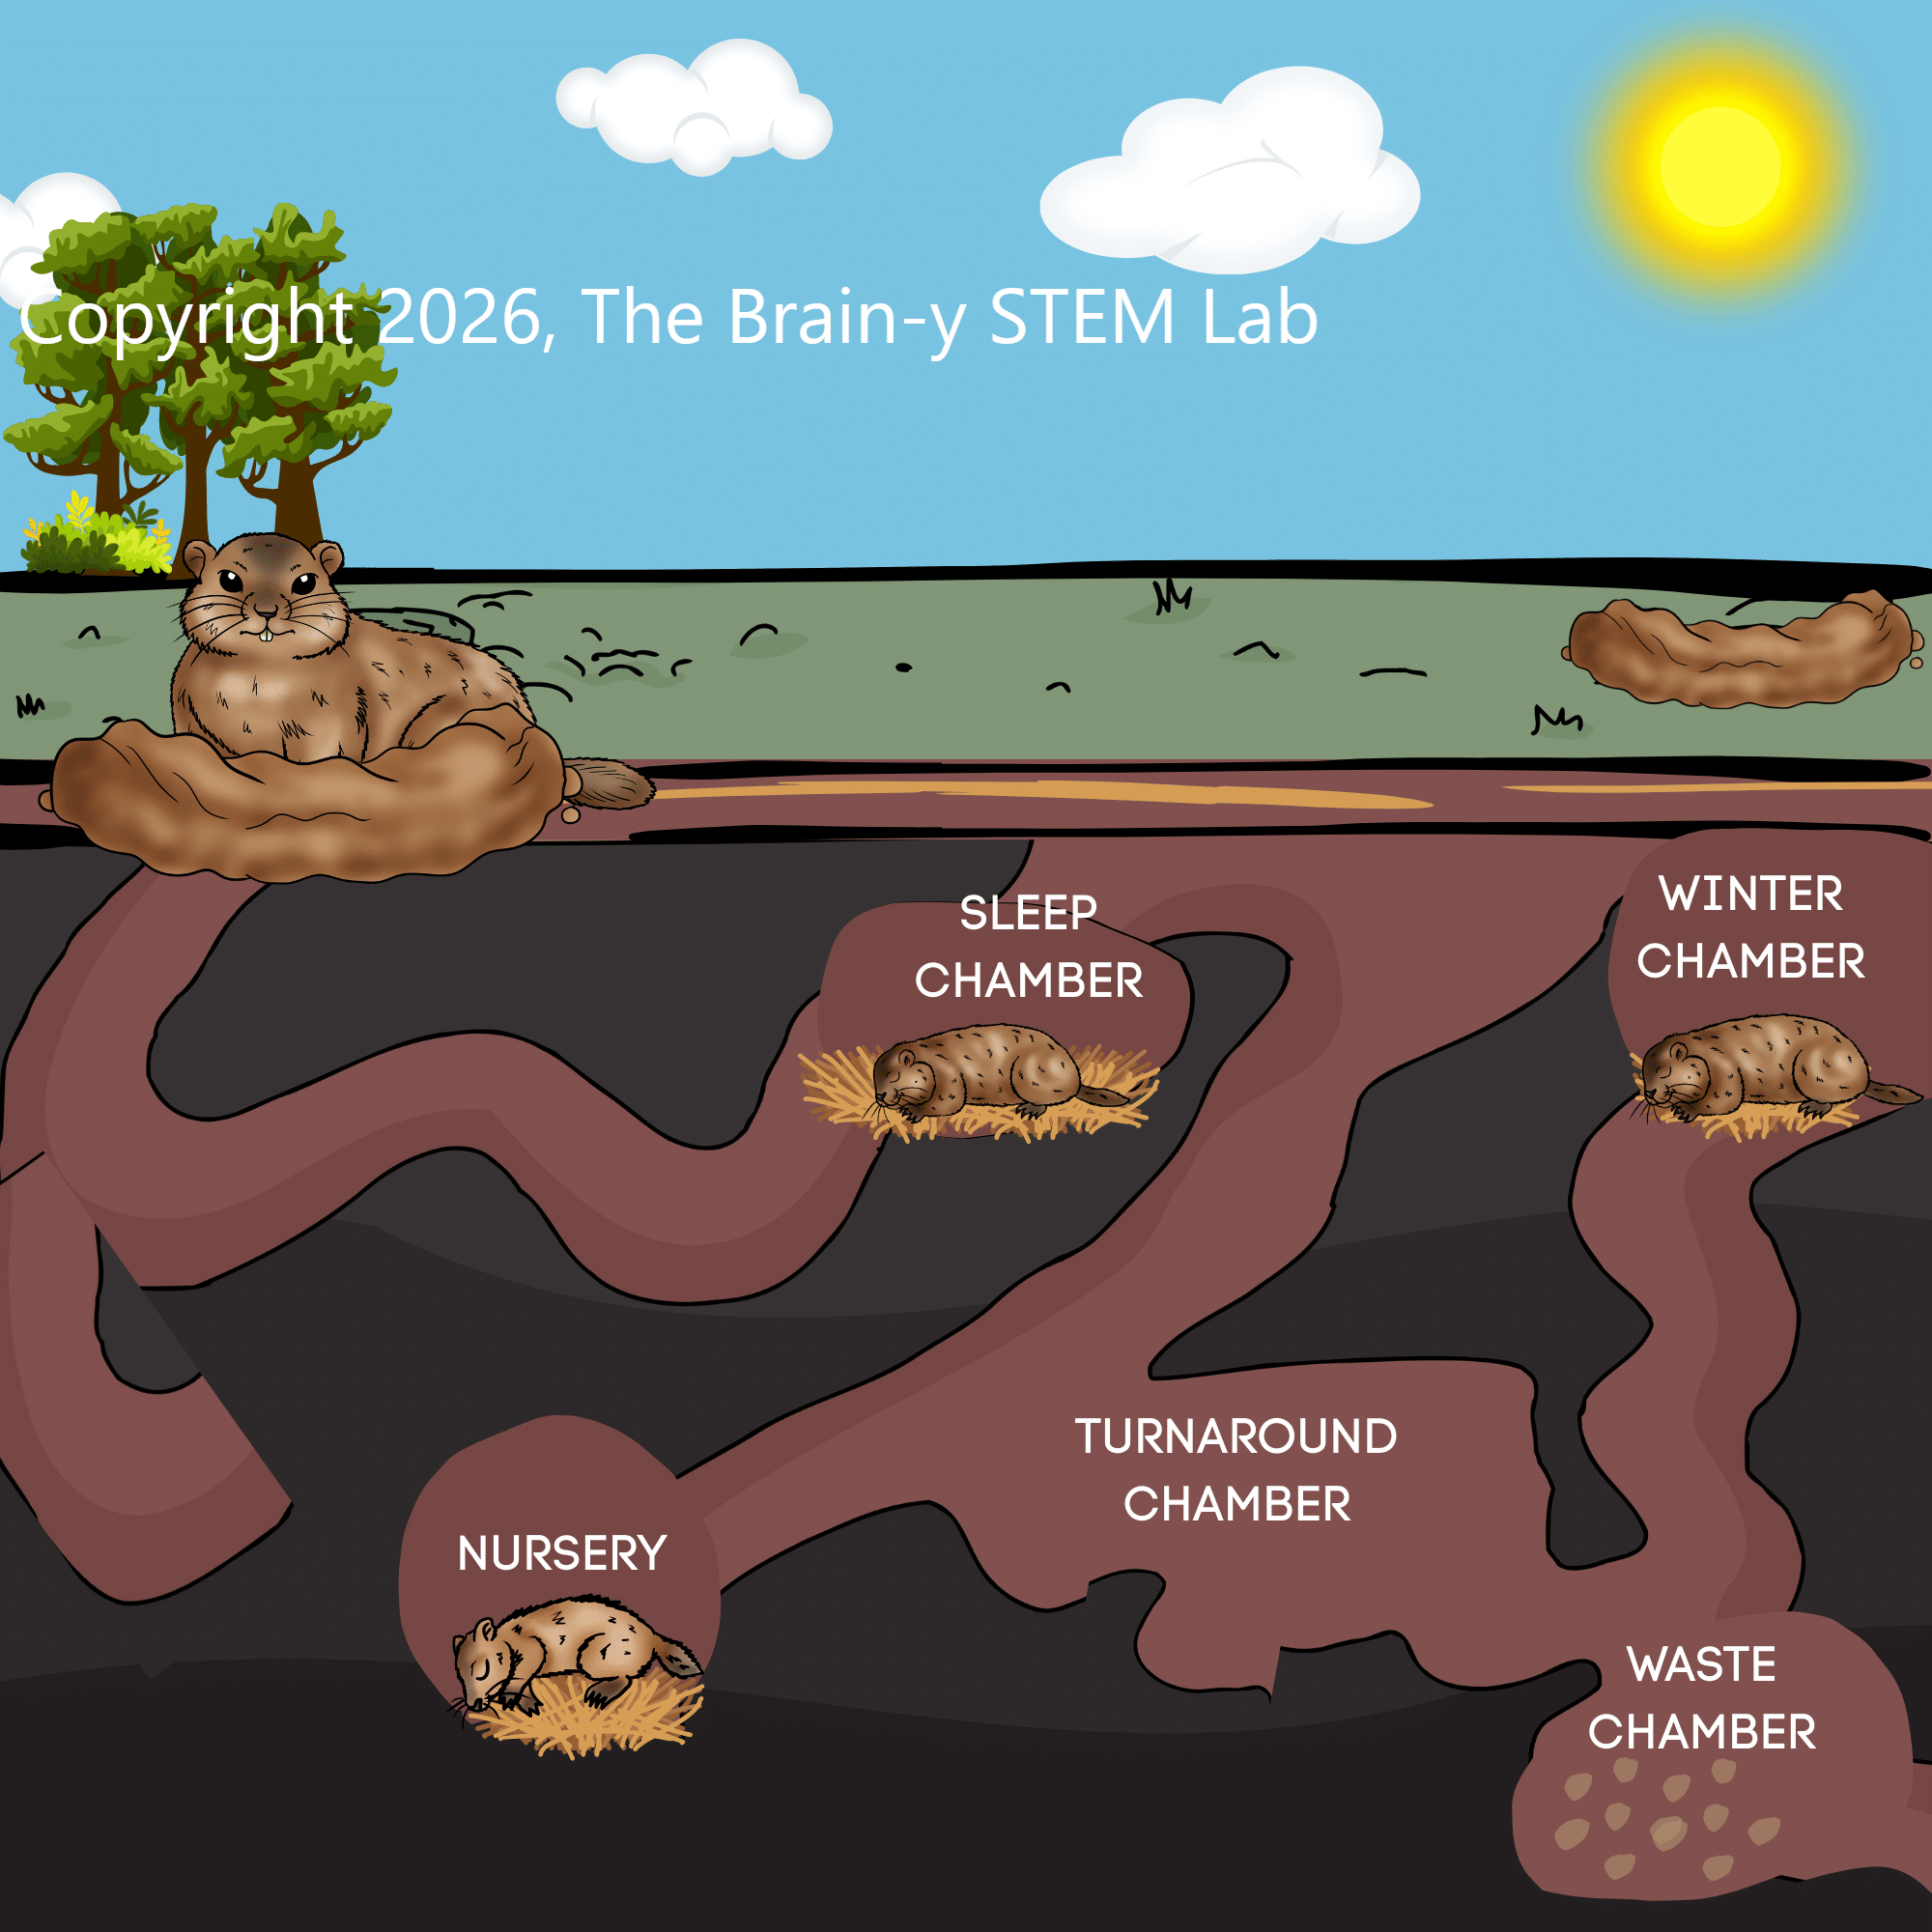
A groundhog burrow can be 2-5 feet deep and 20-60 feet long, which is longer than a bus! If you have an open area and tape masure, mark off an area that is 5 feet by 20 feet.
These burrows protect them from predators (animals that would harm or eat them), cold temperatures, and bad weather.
Their abandoned burrows provide homes for rabbits, foxes, and other animals. Their digging helps mix and aerate the soil, and they help control plant growth by eating vegetation (plants).
In this photo, a groundhog is gathering dead leaves that are used to insulate the different chambers in their burrow.

Safety Features of a Groundhog’s Burrow
More than one entrance: There are at least two entrances to the burrow. Having more than one entrance helps the groundhog make a quick escape if a predator does get into the burrow.
One chamber near the soil line: Water can flood tunnels, so the burrow has at least one chamber higher than at least one tunnel.
Hidden entrances to the burrow: Many burrow entrances are hidden by grass, leaves, or soil. Some openings are placed where they are hard to see. This makes it difficult for predators to find the burrow.
Narrow tunnels: The tunnels are often just wide enough for the groundhog’s body. This makes it harder for larger predators to follow.
Curved tunnels: Tunnels are curved to help slow predators or block their view into the burrow. If the burrow is straight, they can see more of the inside. If the tunnels are curved, the predators can’t see around those corners from one of the entrances.
Placement of the nesting chamber: The nesting chamber is placed deeper underground and away from the main entrances. This helps keep the groundhog and babies protected. Plus, being farther from the surface means that the noise or movement in the burrow is more difficult for predators to hear.
Adding insulation: Even when the air outside the burrow is cold, the burrow remains slightly warmer because the soil traps air, helping keep it warm. We say that the soil helps insulate the burrow. Your apartment, house, or condominium has insulation in the walls to help keep you warmer in winter and cooler in summer. Groundhogs use leaves, dry grass, and sticks to help insulate their burrow.
Engaging Groundhog Day Science Activities for Learning
Building a Groundhog Burrow
There are several ways to complete this challenge based on your schedule, budget, and resource availability. The goal is to have fun and incorporate what your child has learned. You may opt to have your children complete this individually or as a team (on in teams).
Allow time for your children to get creative. This is a project that can be completed over several days, classes, meetings.
- Using craft materials and following the instructions on the following pages.
- If your children have access to Canva or AutoCAD, they can use the design worksheets that follow this page to create their burrow digitally.
- Using paper and pencil only. Your child can plan their burrow using the worksheets that follow, then draw their burrow design on paper, cardstock, cardboard, or poster board.
Build a Groundhog Burrow STEM Challenge
In this challenge, you are going to design and build a model of a groundhog burrow that protects the groundhog from predators, the weather, and cold temperatures. Your burrow should also have the chambers we reviewed. Refer to the burrow diagram included in the printable for inspiration. 🙂
You can use a large piece of cardboard from a box, or a small box with some sides cut off, to expand the area you have to work with. (We just used a big shipping box we had from a gift.)
Materials
- Small paper cups
- Straws (While actual tunnels are bigger, because of the space on the cardboard or posterboard, straws make it easier to add the tunnels and burrows needed.)
- Dried leaves and sticks or construction paper to help camouflage the entrances
- Cotton, yarn, or dried leaves for insulation
- Craft sticks or other craft materials
- Tape, glue
- The design worksheets that follow, pencil
Engineering Requirements
The burrow must include:
- Two entrances
- One nesting chamber
- The nesting chamber must be higher than one of the tunnels to help keep the groundhog safer if their burrow floods.
- One hibernation chamber
- One sleeping chamber
- One turnaround area
- One bathroom chamber
- Have some insulation
- One entrance must be partially covered, making it harder for predators to see it.
- Must be stable (stay together when moved from one table to another)
Download the free printable and use the design pages to sketch and write up your ideas.
Then, get building! Here are photos from our project: (Insulation was added at the very end, we forgot to get photos!)


Groundhog Day Science Activities – Measuring Shadows
Of the different Groundhog Day science activities we have done, this is by far our favorite! You can use this to also teach about how and why day and night happen and the seasons.
If you download the printable, the full lesson on light, shadows, and the seasons are included. We’re going to get straight to the activity.
As a variation on this activity, you could have your children use different colors of chalk to outline the shadow throughout the day.
Groundhog Day Science Activities
How Shadows Change: Measuring a Groundhog’s Shadow
Materials:
- Groundhog template in the free printable
- Cardstock or thick paper. If you have thin cardboard, students can trace the groundhog onto the template or glue it onto the cardboard, then cut both out.
- Scissors
- Coloring supplies (optional)
- Tape
- 2 wooden skewers (dollar store), or you can try two straws. It depends on how soft the soil is in your area.
- A sunny day and a spot outside that is free from the shadows of other objects during the day.
- Measuring tool: yard stick, tape measure, or meter stick
- Pencil + recording sheet included in the free printable
Instructions
- Print the groundhog cut-out on cardstock. Color and cut it out. Or, if you have thin cardboard, students can color the groundhog printable, glue it onto the cardboard, and cut around it. If it’s super-windy, you might have to use a heavier material.
- Use tape or glue to secure the groundhog to the skewers (See the photos on the next page.)
- Pick a big, open area outside where your groundhog will be in the Sun for several hours. It’s easiest if you can place it on the front edge of a sidewalk, as depicted in the photos on the next page.
- If it’s a windy day (as it was for us), you will have to wait until the wind dies down to take quick measurements!
- Use a tape measure, yardstick, meter stick, or ruler to measure the height of the shadow and record it on the worksheet. Then measure the width of the shadow and record it. The shadow does get long, so a 12″ ruler will not be long enough. Another option is to use different colors of chalk and outline the groundhog’s shadow at each measurement or take a photo from the same spot.
- Repeat measurements throughout the day.


I hold a master’s degree in child development and early education and am working on a post-baccalaureate in biology. I spent 15 years working for a biotechnology company developing IT systems in DNA testing laboratories across the US. I taught K4 in a private school, homeschooled my children, and have taught on the mission field in southern Asia. For 4 years, I served on our state’s FIRST Lego League tournament Board and served as the Judging Director. I own thehomeschoolscientist and also write a regular science column for Homeschooling Today Magazine. You’ll also find my writings on the CTCMath blog. Through this site, I have authored over 50 math and science resources.