

uHandy Mobile Microscope – See Amazing Things In Your Homeschool or Classroom
If you follow us on Instagram, you know that we love macro photography and the detail in nature it reveals. However, we were looking to move beyond macro photography in our nature study with a microscope. The uHandy mobile microscope will kick up any nature study by giving you easy access to microscope features out in the field.
But how do you carry a traditional microscope out into the woods or to the pond and make it easily accessible to all ages in your homeschool? We have tried some of the less expensive microscopes for kids, but they were difficult to focus and the results weren’t consistent and often frustrating.
Review of the uHandy® Mobile Microscope
This post is sponsored by uHandy®. We had a great time with this mobile microscope and the opinions shared here are a reflection of how much we loved this new addition to our science shelf.
We found a perfect solution to adding a microscope to our homeschool science in the uHandy® Mobile microscope. We were given one to review and …WOW!
Wolf Spider leg sample magnified 280x .


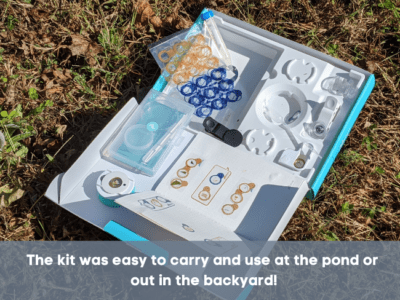
It’s accessible, easy to use, super-portable, and provides consistent viewing results.
This little attachment to a smartphone or tablet opened up a whole new world while out in “the field.” This mobile microscope is easy to use; my daughter had it set up in minutes and used the test sample to get acquainted with positioning the lenses.
First Impressions
Prior to receiving our portable microscope, we visited the uHandy® website and watched their videos. Our excitement level was high once we discovered how cool this microscope was going to be.
Let’s be honest, the first thing we did was open the box and ooh and ahh. But we did resist just tearing into the box so we could do an unboxing video to methodically show kit contents. Later, I did edit the video to add some helpful notes about specific components.

Everything needed to do microscopy work comes in the kit, including:
- a low magnification lens
- a high magnification lens
- viewing slide
- light stage
- sample stickers to help your student quickly collect samples to view
- collection tools
We used the uHandy® Mobile Microscope Duet Kit. Check out the video below to view a quick tour of the kit components.
We were fascinated by the unique and thoughtful design of the microscope. The use of the magnets in the base was ingenious and adaptable to a variation of phone types. We quickly and successfully set up two phones and an iPad with the app and practiced with the sample card before heading out to a nearby pond.
When we think microscopy, we get intimidated and think it has to be something involved and difficult. The uHandy® mobile microscope is that easy to use.
So, let’s show you just how easy!
Getting Started and Heading Out to Use Our Microscope
We were scheduled to do a pond life unit when the mobile microscope arrived, so we packed up our supplies, grabbed the microscope kit, and headed over to a pond adjacent to our property for some pond dipping.
Before we left, we:
- Downloaded the Uhandy® app from the Play® Store (or iTunes®). The app is fantastic!
- Became familiar with the app. There are handy and short tutorials on the app. Plus, it or your camera can act as the lens to view what is shown under the low and high magnification microscope lenses.
- Inserted the two batteries into the light stage
- Tested out the microscope using the enclosed sample card
The uHandy® Mobile Microscope fit right into one of our backpacks.

Once at the pond, we started by gathering a water sample. The kit includes all the tools to do this—pipettes and a small collection tube with a secure lid.
This is what we saw!
After returning home, we did some research and think this is a rotifer. The uHandy® Mobile Microscope amped-up our pond study! We know all of this microscopic activity is going on around us, but to be able to see it real-time was an eye-opening learning opportunity for all of us.
We walked to a different area of the pond and took another sample. We captured a small speck on the sticker slide and put it under the high magnification lens.
Check it out! That little speck was an insect!
Isn’t that amazing?!
It’s so easy to zoom in and see more detail. Since you are using your phone camera or the uHandy® app, you zoom in with your fingers.
Microscopy Made Accessible
One of our goals here at TheHomeschoolScientist is to make learning accessible and enjoyable. If you have ever taught a child with a learning challenge or a physical challenge, you know some learning situations can be frustrating. A traditional microscope can be difficult for those with special needs to access the microscope due to the height of the table surface or the student’s inability to stand, or physical differences that make it difficult to use the eyepiece. The uHandy® mobile microscope allows students to see things on their phones at their own level and at their own need of access.
This Mobile microscope opens a new door for younger students or those with special needs because of its ease of use and well-planned design.
More Microscope Lessons in the Backyard!
We actually keep our mobile microscope box by the back door because we have taken it out into the backyard numerous times.
We’ve looked at plants, specifically begonias.
Here is the leaf sample we collected shown on the light stage and the sample magnified 280x.


But our coolest backyard find was a dead wolf spider found on the floor of the back porch. You know that was met with some excitement!
Here is a macro photography photo of the spider.


Here is a sampling of the spider’s leg:

Is This Microscope a Worthy Addition to Your Homeschool?
This mobile microscope opens up so many new learning and discovery opportunities for our children, families, homeschools, and classrooms.
Having access to mobile microscopy in our homeschool has:
- Brought a new dimension to our nature journaling. As you can see from our photos, the level of detail is astounding.
- Generated questions and discussions about what the microscopic view revealed
- Led to more research to answer our questions
- Increased observation skills. Your children will walk around the house or yard looking for things to put on a sticker slide and place on the light stage
- Taken the intimidation out of microscopy and makes it accessible to children before the high school science courses. For many, microscopes aren’t experienced until high school biology. But the uHandy® Mobile Microscope can be enjoyed by all ages. Why wait to introduce children to the spectacular details around us?
Why We Highly Recommend the uHandy® Mobile Microscope for your Homeschool or Classroom
- Everything you need is included. This truly is open and go. We do recommend watching some of their short videos and downloading the app.
- It’s quick and simple to create your slides and easily view what’s on them.
- Everyone, even those with special needs, can easily view what’s “under the microscope.”
- The images are astounding.
- The learning opportunities are multiplied by the discussions and research students engage in as a result of the amazing new details they see.
How to Incorporate the uHandy® Mobile Microscope into Your Homeschool Science
First, I want to clarify that this microcope can be used anytime. Like I said, we kept ours out and at the ready because everyone will find something they want to put onto a slide and view. We even looked at sour milk that was in our refrigerator. Then we compared it to fresh milk.
After using this microscope for a few weeks, this is how it started to fit into our homeschool:
- We didn’t formalize its use by storing it neatly away in a cabinet when not in use. We kept it out and ready to use. We want our children and students to love learning and get excited about it. One way to do this is to let children take ownership and have input as to how they want to learn and what they want to learn.
It’s fun for them to grab this microscope, a tablet or phone, the collection stickers, and head out to the backyard. (We had the best time with our birdbath water too!)
- I scheduled extra time when we were using the microscope in our lessons. For example, our visit to the pond went longer than I had planned. Yet, we discovered and learned so much more than what was on the lesson plan.
- Have a journal handy. The uHandy® Mobile Microscope does come with a collecting album (see photo below), but we also used our sketch pads to record what was viewed, where it was found, and facts we learned in any follow-up research.

- Plan time to research what your children find. When we returned home from our first visit to the pond, we spent time researching microscopic life, watching videos of rotifers, and reviewing the video. If this type of spontaneous research and learning encroaches on other lesson plans, moms, teachers…let it!
- Use it alongside your regular science lessons. We were studying trees and why leaves change color. We collected a variety of leaves and had a much better understanding of leaf cells and pigments because we could view different colored leaves under this microscope.
This microscope is going to WOW your students and up their curiosity; let them run with it!
What We Liked Best
The uHandy® Mobile Microscope earned a resounding double thumbs up in our household and homeschool.
- We loved how easy it was to use and made the microscopic world so easily and readily visible to us.
- It is well-designed. The slide and light stage are magnetized, which takes away a lot of the frustration of trying to center a slide on a traditional microscope.
- Everyone in our family enjoyed this microscope. It’s not just for relegating to a lesson plan—yes, it is a fantastic teaching aid for science lessons, but it is just plain fun anytime.
- The quality of the images are phenomenal, whether you use a smartphone or tablet.
Where to Purchase a uHandy® Mobile Microscope for Your Homeschool or Classroom
Purchase a uHandy® Mobile Microscope for your family, homeschool, classroom, or co-op on Amazon.
I hold a master’s degree in child development and early education and am working on a post-baccalaureate in biology. I spent 15 years working for a biotechnology company developing IT systems in DNA testing laboratories across the US. I taught K4 in a private school, homeschooled my children, and have taught on the mission field in southern Asia. For 4 years, I served on our state’s FIRST Lego League tournament Board and served as the Judging Director. I own thehomeschoolscientist and also write a regular science column for Homeschooling Today Magazine. You’ll also find my writings on the CTCMath blog. Through this site, I have authored over 50 math and science resources.