

How to Make an Arm Model


Are sports or staying physically active a part of your family’s lifestyle? Whether jumping rope on the sidewalk or running down the field at soccer practice, physical activity builds endurance and strong muscles. In this activity, we will learn how to make an arm model.
Our children need to learn as much as possible about body mechanics. Body mechanics is how we move our bodies to make everyday tasks easier and safer. It’s about using the right parts of our body to do things like lifting, bending, and reaching.
Helping our children understand using good body mechanics helps prevent injuries, like strains or sprains. For example, if you lift something heavy, bending your knees instead of your back can keep you from getting hurt.
Here is a good article from Mayo Clinic about children and strength training that might be helpful to review as part of this study.
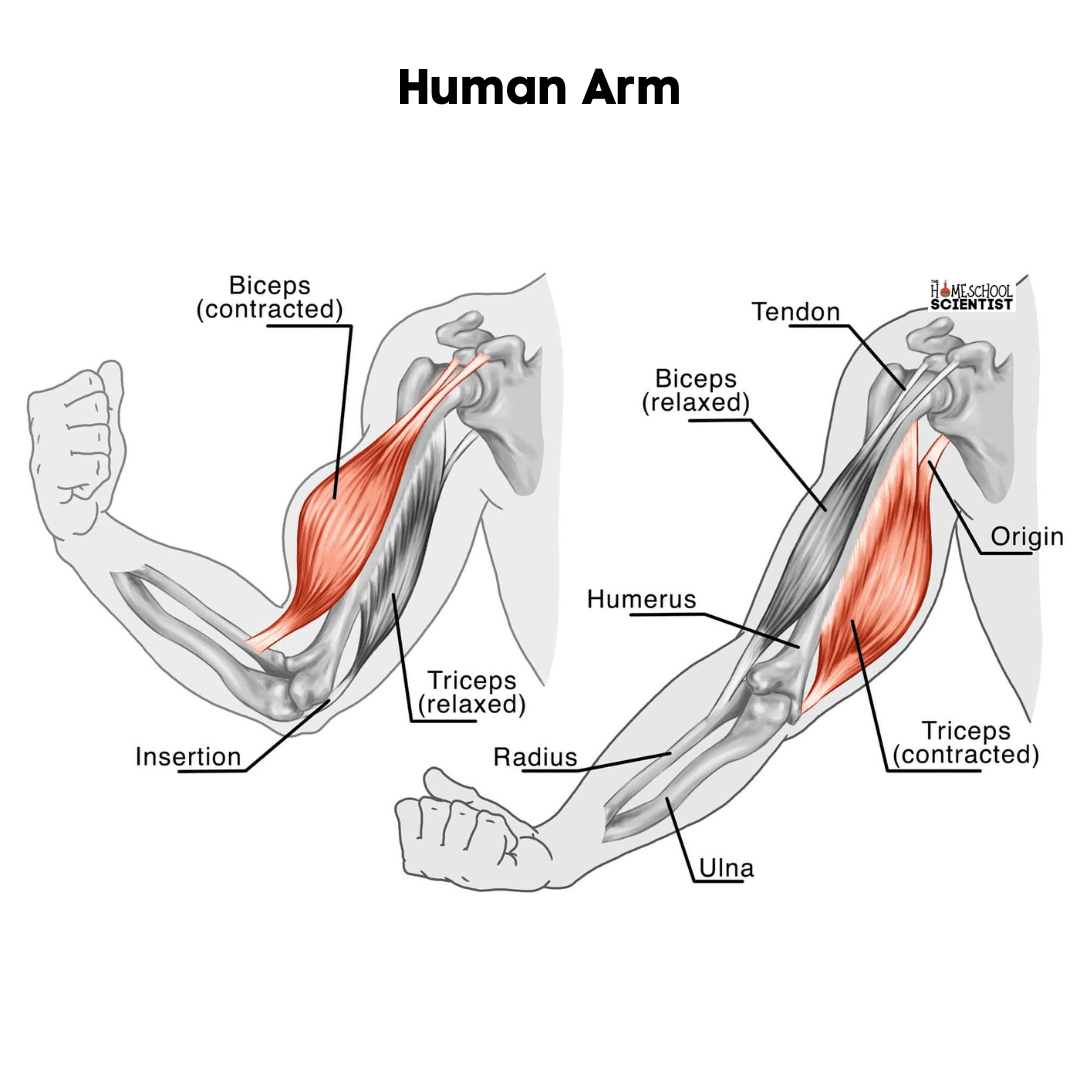
In this activity, we will learn the basics about our arm’s main muscles and bones and how they work. If you want to learn more about the anatomy of the arm, we have links in the free printable.

Strong arm muscles, including the forearms, shoulders, and triceps, are essential for generating power and speed in sports like baseball, swimming, and volleyball.
Muscle flexibility is also important. Flexibility describes the ability of musculoskeletal joints to move through a normal and full range of motions. When you raise your arms up, reaching both hands up and clapping above your head takes your shoulder through one direction of its range of motion.
Why should we care about flexibility? While new research is showing stretching might not prevent delayed-onset muscle soreness (soreness hours or days after exercises) as previously thought, maintaining good flexibility helps reduce the risk of injury, improve posture, increase range of motion, and improve stress management.
One of the most important rules to remember about stretching is to always warm up before stretching. But why?
Our muscles are composed of many small fibers forming bundles, somewhat similar to many strings forming a rope. When we stretch cold muscles, those fibers tear, causing soreness and possibly injury. Warm muscles (warmed by increased blood flow and body temperature as you increase movement) stretch much easier and safer as a warm rubber band stretches farther.
Try This Quick Demonstration
Let’s try an experiment. Grab a rubber band and stretch it between your fingers, noticing its easy elasticity and wide range.
Now lay the rubber band flat on a shelf in the freezer for a few hours (12-24 hours is best). Retrieve your now-frozen rubber band and immediately try stretching it. Does it stretch as far? What happens if you stretch it too far now that it’s frozen?
It breaks! This analogy demonstrates why we want to move around some before stretching. Our muscles are composed of many small fibers forming bundles, somewhat similar to many strings forming a rope. When we stretch cold muscles, those fibers can strain, causing soreness and possibly injury. Warm muscles (warmed by increased blood flow and body temperature as you increase movement) stretch much easier and safer as a warm rubber band stretches farther. (You can read more about muscle strain here and on the Cleveland Clinic site.)
Now, let’s build a model of an arm. We have provided written, photo, and video instructions.
Also, we have a free printable with these instructions and photos, so you can easily use this offline.
How to Make an Arm Model (that moves!)
Here are the materials you’ll need to gather for the arm model:
- Large piece of white poster board or several pieces of card stock
- A thumbtack or something to poke small holes through several layers of poster board or card stock. You can also use a long nail or the screwdriver that comes with an eyeglass repair kit.
- Scissors
- Marker
- Large paper clip
- 2 long balloons
- Tape
- The handprint template that is included with this activity
Instructions – See below for a visual guide showing how to make this arm model
- Cut three pieces from the posterboard. 2 pieces will be 8.5 x 11, and the third piece is 12” x 10”.
- Roll the 2 8.5 x 11 pieces of posterboard so that they make 2 – 8.5” wide rolls. Secure these with tape.
- Roll the third piece to make a 12” long roll. Secure with tape.
- On one of the 8.5” long “bones”, write ULNA. On the other 8.5” bone write RADIUS.
- On the longest “bone”, write HUMERUS.
- This next step requires adult or adult supervision. We used a thumb tack to make the initial holes and then used a small eyeglass screwdriver to make the holes a little bigger. (You will need to thread a paper clip through the holes, so they need to be bigger holes.)
- On the humerus, punch a hole through all of the layers, ½” from the RIGHT EDGE.
- On the Ulna and Radius bones, punch a hole through all of the layers ½” from the LEFT EDGE.
- Arrange the radius, humerus, and ulna so the holes line up. The radius should be on the bottom, the humerus in the middle, and the Ulna on top.
- Straighten the paper clip. Then, thread the paper clip through the holes as shown.
- Next, blow up two long balloons used to make party animals. You want to leave a tail at the beginning and end of the balloon. We found that the best way to get some tail on the tied-off end of the balloon is to blow the balloon up more than needed, then let out some of the air, stretching the open end as you allow air to escape. Tie the balloon off as close to the “air bubble” as possible. The finished length of the balloons should be about 8”.
- Tie one end of the first balloon to the ulna and radius, then tie the other end to the top of the Humerus. See the photo. This balloon represents the bicep muscle in our forearm. Have your child write BICEP on this balloon with a marker.
- Tie the second ballon in the joint area where the ulna and radius meet. Then, come around the back of the “joint” and up the humerus. Tie this second balloon to the humerus above the other balloon. This balloon represents the triceps. This balloon represents the triceps. Have your student write TRICEP on this balloon.
- Color the hand and tape it to the free end of the radius and ulna.
Having a visual aid like this model of an arm helps students understand how the body mechanics of the arm work. Using our bodies correctly helps keep our muscles and joints strong and healthy. It ensures we’re not putting too much stress on any part of our body.
Encourage your children to use their arm model to teach others about the main bones and muscles in the arm and how they work together.
Instructions for the arm model in photos:

Materials

Step 1

Step 2 & Step 3

Step 4 & Step 5

Step 6

Step 6

Step 6

Step 7

STEP 8

Step 8

Step 8

Step 8

Step 9

Step 9

Step 10

Step 10

Step 11

Step 11

Step 11

Step 12
I hold a master’s degree in child development and early education and am working on a post-baccalaureate in biology. I spent 15 years working for a biotechnology company developing IT systems in DNA testing laboratories across the US. I taught K4 in a private school, homeschooled my children, and have taught on the mission field in southern Asia. For 4 years, I served on our state’s FIRST Lego League tournament Board and served as the Judging Director. I own thehomeschoolscientist and also write a regular science column for Homeschooling Today Magazine. You’ll also find my writings on the CTCMath blog. Through this site, I have authored over 50 math and science resources.