

How to Make a Fruit Powered Clock
Teaching our kids how to make a fruit powered clock is an engaging way to help them learn about circuits, electricity, and renewable energy.
This is one of our favorite activities, as you can tell from our post about experiments with oranges and our fall-themed pumpkin-powered clock. Using cranberries, gourds, and pumpkins, this makes a fun Thanksgiving STEM activity!

As the seasons change, it’s fun to change up this activity and test different fruits.
This is also a good activity for Earth Day!
By the way a science fair project about how to make a fruit powered clock using different fruit and measuring volts would make an interesting and engaging study and display. Background information could focus on renewable energy.
Dependent and Independent Variables In Our Test of Fruit Powered Clocks
Before we make our fruit powered clocks using a variety of fruits and measuring voltage, let’s talk about independent, dependent, and control variables.
An independent variable is a variable that is changed in an experiment. This is what you, as the experimenter, are testing to see how it affects something else. In this part of our activity. In this activity, the independent variable is the type of fruit we use to create the fruit powered clock.

The dependent variable is what we are going to measure. It is called “dependent” because it depends on the changes you made to the independent variable. In this activity the dependent variable is the voltage level on the multimeter displayed as millivolts.
Control variables are the parts of the experiment that stay the same. These are important because if you change too many things at once, you won’t know what caused the results. As we learn how to make a fruit powered clock and measure voltage, the control variables are the wires, the probes, the LED clock leads, and the multimeter. We will use the same wires, probes, LED clock leads, and multimeter. (Note: We used a different multimeter when we made our orange-powered clock. If we were using this for a science fair project, we would remake the orange clock and use the red multimeter.)
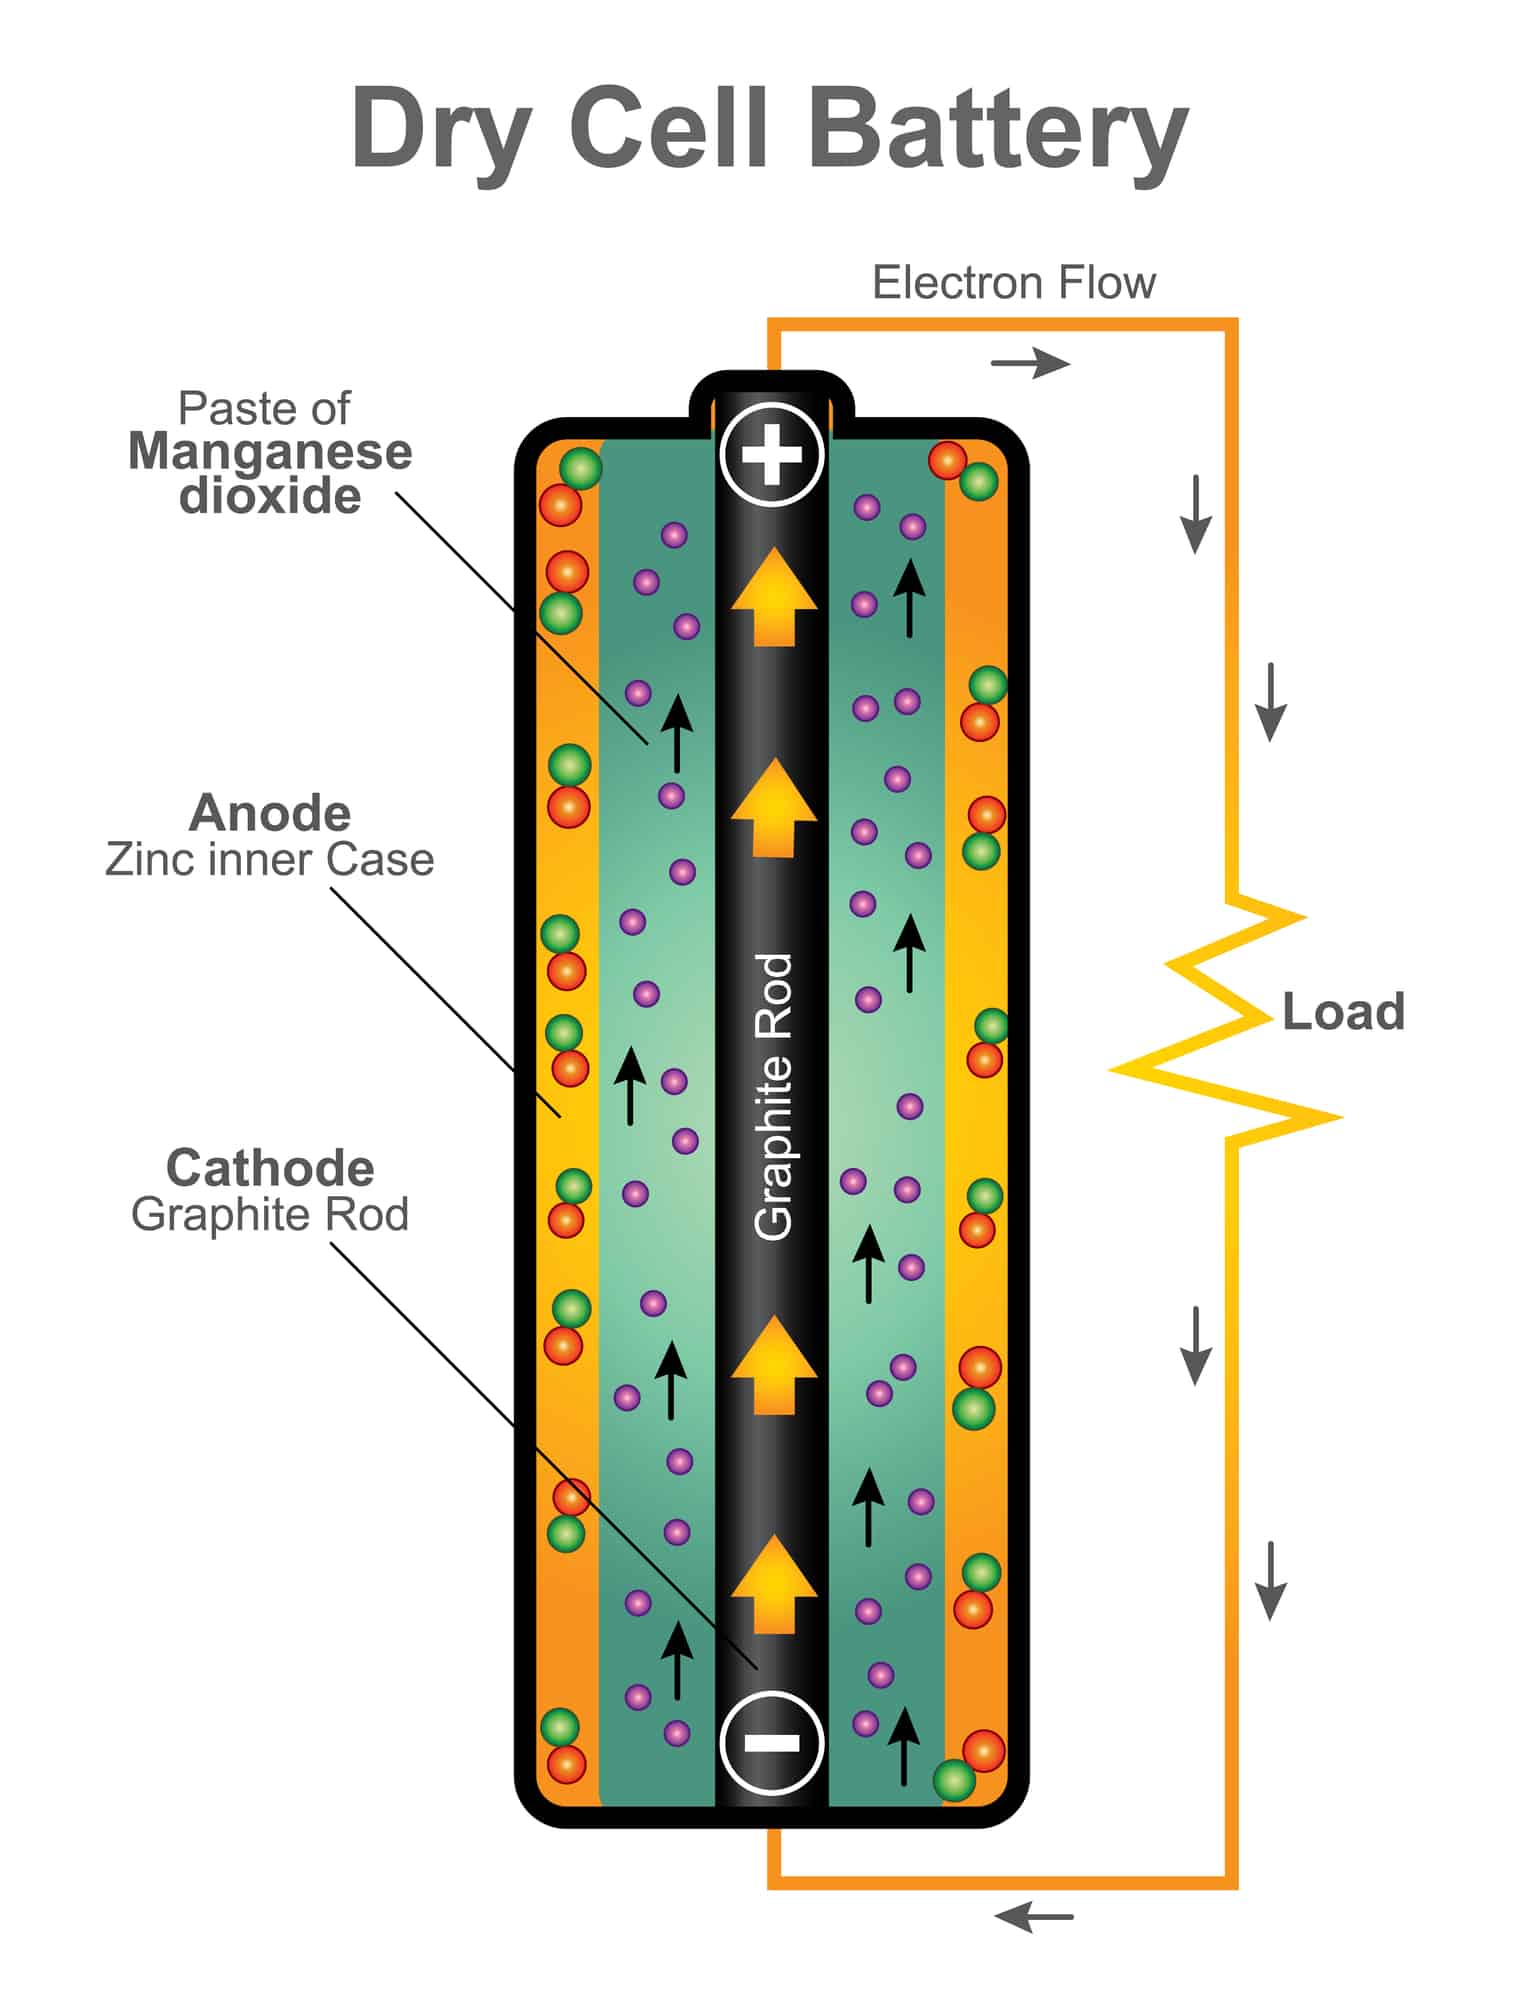
Some Background Information About Batteries
According to the Energizer battery company, the following chemicals are inside a 9-volt, AA, AAA, C, and D battery: “…steel and a mix of zinc/manganese/potassium/graphite, with the remaining balance made up of paper and plastic.” See the resources at the end of this post to learn more about how batteries work.
The chemicals in the battery begin to react when you place the battery into a circuit and complete the circuit. For example, in this Build a Circuit post, when the circuit is complete, the LED in the greeting card illuminates.
Another example is when you put batteries into a flashlight, then press the button to turn on the light. The button is pressed in and the circuit is then complete, so the battery powers the flashlight bulb.

Each battery has a positive and negative terminal. When the circuit is complete the electrons created by the chemical reaction flow from the negative end of the battery to the positive end. If a wire is attached the flow of electrons produced by the chemical reaction then flows through the wire or metal that is attached to the positive end of the battery.
In this activity we will be using chemically-made electricity in our homemade battery power the clock.
Supplies Need to Make a Fruit Powered Clock
You have two options when gathering supplies to make the fruit powered clock and battery.
We always use our potato-powered clock kit. This is the one we have used for our orange, pumpkin, and now our gourd, and cranberry clock projects.


You can also gather – two pennies, two zinc-galvanized nails,3 alligator clips, and LED clock with leads. You can see a set up over on Scout Life How to Build a Lemon-Powered Clock. However, if you do not use a prepackaged kit like this one, you’ll have to find a battery-operated small LED clock. (I have seen them on eBay.)
You will also need to gather the fruit. When teaching my kids how to build a fruit powered battery, we used oranges, cranberries, pie pumpkins, mini pumpkins, and gourds since it was Fall and nearing Thanksgiving. You can use any seasonal fruit – oranges, lemons, limes, watermelon, etc.
NOTE: Some fruit will have a thick skin. An ADULT should carefully use a knife to pre-make the slits in the fruit for the leads. Make sure the slits are deep enough, or the leads on the multimeter may break.
Photos of our various fruit powered clock projects are listed below. Place a copper lead in each fruit. Place a zinc lead in each fruit. Connect the copper lead in one fruit to the zinc lead in the other fruit. Then, attach the clock leads as shown in the photo below.
The red lead from the clock is attached to the open copper lead in the one fruit. The black lead from the clock is attached to the open zinc lead in the other fruit.
To measure the voltage in your fruit powered clock, place the leads in the multimeter as show in the photos below. The red alligator clip of the multimeter is put into the fruit with the red lead from the clock. The black alligator clip is put in the fruit with the black lead from the clock.

Using Oranges to Build a Fruit Powered Clock
You can read a full description of this project here.
Here is the set up for our orange powered clock. You can read more about our set up on this post.
As you look through the photos of the different fruit powered clocks, note the multimeter readings.
Remember, these readings (except the oranges) are in millivolts. Divide the displayed number by 1000 to get the number of volts.
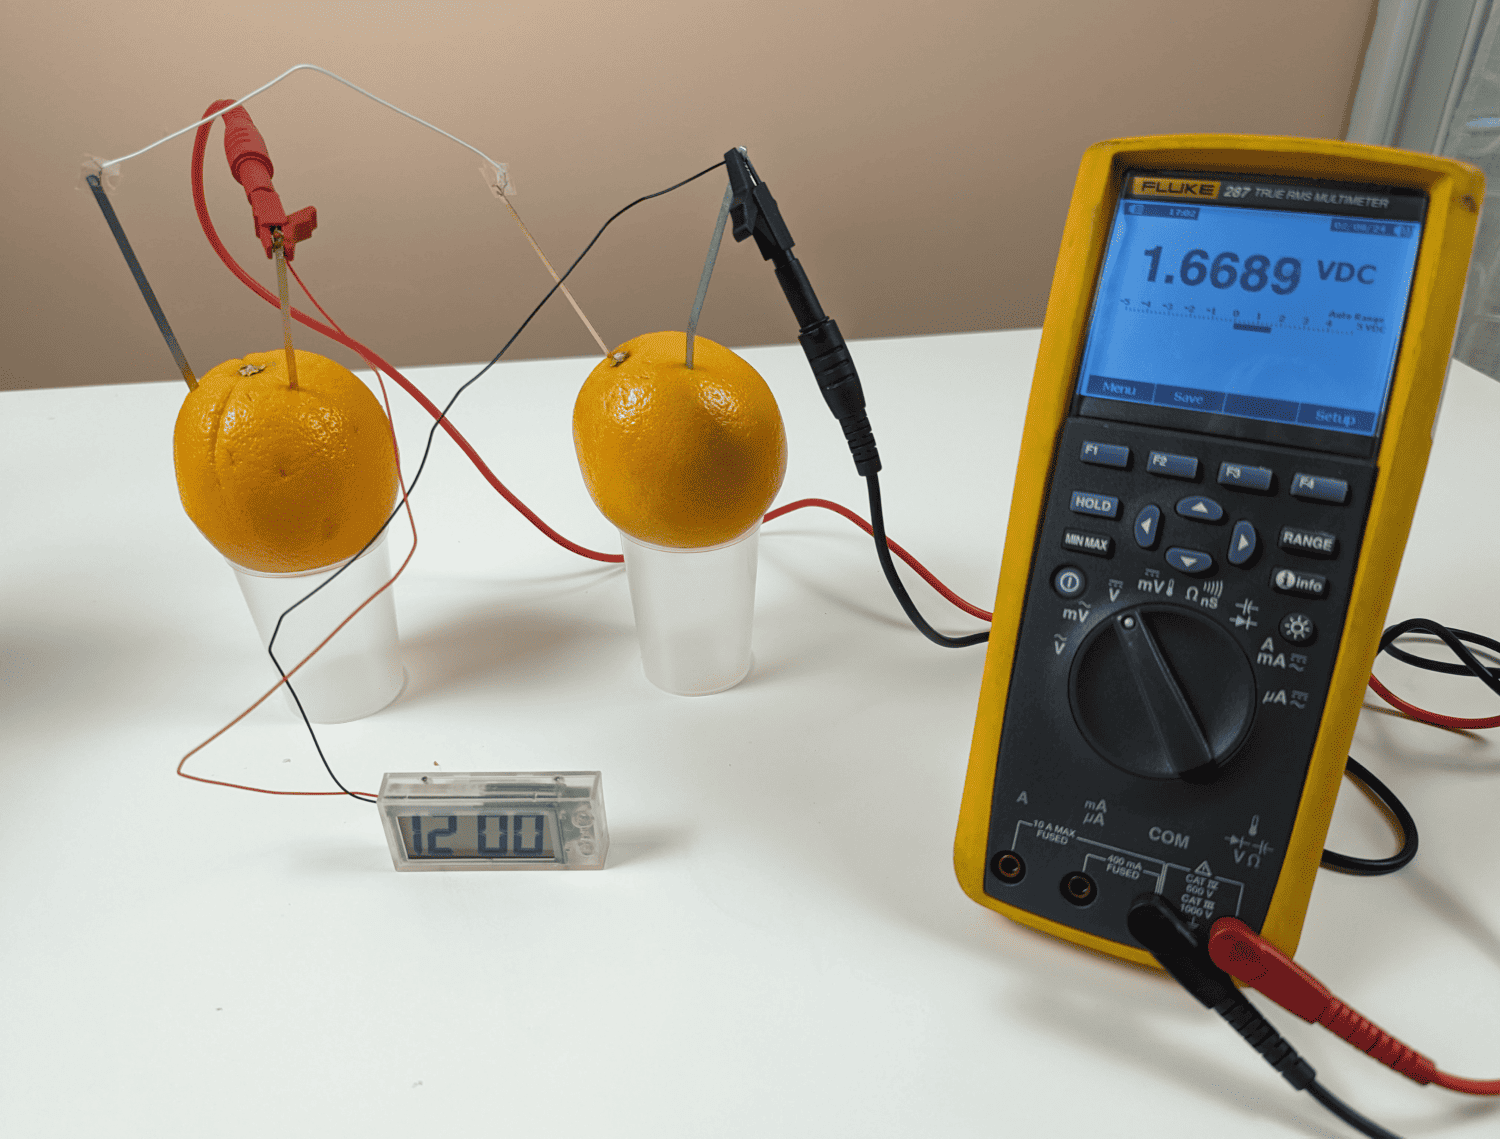
In this orange powered clock, we used a multimeter that displayed in volts, rather than millivolts. So, no need to do a conversion calculation.

Mini pumpkin-powered clock
The 252 millivolts, is divided by 1000 to convert the reading to .252 volts.
Gourd-powered clock
The 564 millivolts reading is divided by 1000 to convert the reading to .564 volts.

Cranberry-powered clock
The 23 millivolts reading is divided by 1000 to convert the reading to .023 volts.

Pie pumpkin-powered clock
The 564 millivolts reading is divided by 1000 to convert the reading to .558 volts.
Our fruit powered clock is powered by a type of battery known as an electrochemical cell. We are converting chemical energy into electrical energy. In this setup, the chemicals zinc and copper react with one another, producing chemical energy.
This chemical energy is then transformed into electric energy through the transfer of electrons. These electrons flow through the fleshy inside of the fruit.
Download the Fruit Powered Clock Printable
Use the form below to request the printable that accompanies this activity. The packet includes a lab worksheet, circuit information, 2-part circuit cards, and circuit mini-posters. You will be added to our email community.
I hold a master’s degree in child development and early education and am working on a post-baccalaureate in biology. I spent 15 years working for a biotechnology company developing IT systems in DNA testing laboratories across the US. I taught K4 in a private school, homeschooled my children, and have taught on the mission field in southern Asia. For 4 years, I served on our state’s FIRST Lego League tournament Board and served as the Judging Director. I own thehomeschoolscientist and also write a regular science column for Homeschooling Today Magazine. You’ll also find my writings on the CTCMath blog. Through this site, I have authored over 50 math and science resources.