

STEM Activities with XTool – Cut and Build a Catapult
We have been enjoying some fun STEM activities with our XTool P2S Laser. In the coming days, I’ll share our cell model puzzle and hydraulic lift. We have so many ideas for STEM projects!
You can read about how we started with an XTool laser by reading this post. There are some tips you don’t want to miss if an XTool P2s laser is on your wish list.
In addition to sharing our laser experience, there’s a free lesson about catapults you can also download. We also have catapults you can purchase in our store.
Here is a video of the Xtool P2S cutting out our first catapult. We put our design in their Creative Space dashboard, made our adjustments, set the type and thickness of the wood. The Xtool then suggested the power level and speed. We submitted the job to the laser, pressed the button, and the cutting started. All of this is shown in a sped-up video below.
I’ve had the chance to use the xTool laser cutter with kids, and it’s been incredible to watch what happens when they realize they can design and make real things. From puzzles to mini catapults, they’re not just crafting.
A laser project can involve a little or a lot of work in a design software (you can use a free design, make your own, or purchase one for as little as $1). Students get to develop skills that engineers use like critical thinking, measuring precisely, and troubleshooting.
I’ve seen firsthand how this kind of hands-on learning builds confidence, encourages creative problem-solving, and blends art with STEM in the most natural way. Laser cutting gives kids the power to turn an idea into something they can actually hold, and that’s a game-changer in how they view themselves as creators.
Here’s a longer video showing the cutting process.
So Many STEM Lessons
In this project, there are so many STEM lessons. We not only learned about how laser cutters and design software, but we also learned about catapults.
So, let’s dig into the catapult information. Much of this information is in our free catapult lesson, with data sheets for the launching activities.
At first glance, catapults seem pretty simple: pull back, let go, launch something through the air, and BINGO, it lands!
But behind that flying marshmallow, ping pong ball, or gumball is some fun and interesting physics.
Catapults change how work is done.
They take a big force over a short distance, when you pull back the arm, and change it into a smaller force over a long distance, when you let go of the arm and it moves forward, launching an object at a high speed.
In other words, your slow, steady muscle power gets turned into a fast, explosive launch.
We’ll talk more about the physics behind catapults later in our study. First, let’s look at the history of catapults, learn about one of the first hand-held tools using a similar idea as catapults, and review the three types of catapults.
A Brief History of Catapults
People have been using tools to launch objects for a long time! Before gunpowder and cannons were invented in the 1300s, armies used catapults in battles. These machines were built to throw rocks, arrows, or even fire over walls to attack castles or enemy forts. The first catapults were made by the ancient Greeks over 2,000 years ago, and catapults were later improved by the Romans. But, there was a tool even before catapults and even before the bow and arrow!
One of the oldest tools used for hunting was the atlatl. It was a hand-thrown spear launcher used by early humans before the bow and arrow even existed. The atlatl worked like an arm extender, storing energy in a stick and transferring that energy to the spear when the atlatl was thrown.

This work has been released into the public domain by its author, Pearson Scott Foresman Pearson Scott Foresman, Public domain, via Wikimedia Commons
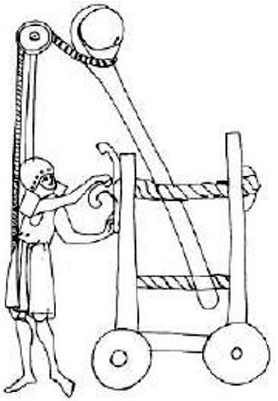
The Ballista – Catapult Design #1
The ancient Greeks invented the first type of catapult, called the ballista. Imagine a giant crossbow that could shoot big arrows or stones really far. It worked by using twisted ropes to pull back a strong arm, storing energy like a stretched rubber band.
The ballista launched bolts, which were very large arrows, and stones with amazing force. The ballista was also very accurate.

Later, the Romans improved the catapult design called the onager. Instead of shooting arrows, the onager was designed to throw huge rocks at enemy walls during battles. It used twisted ropes to get its power, but in a different way from the ballista.
When the ropes were released, the arm would swing forward and fling the rock with a lot of force.
Developed by the Romans around the 1st century BC, the onager was known for its brute force. It wasn’t the easiest machine to control, but when it hit its target, it caused a lot of damage. It was designed to hurl huge rocks that would weaken enemy defenses or create chaos among troops.
Catapult Design #3 – Trebucht
Around the year 1100, during the medieval period, more advanced siege weapons, such as the trebuchet, were developed.
A trebuchet got its power from gravity and was used for hurling huge stones, diseased animals, fire pots, and other objects.
A trebuchet could launch 200-300-pound objects over 300 yards. 300 yards is about the length of three football fields.
Catapults – Potential and Kinetic Energy
One of the key science ideas behind how catapults work is called Conservation of Energy. This means that energy can’t be created or destroyed, but it is changed from one form of energy to another. You might’ve heard it called the First Law of Thermodynamics.
These sound like big words and ideas, but it’s not that difficult to understand. Let’s break it down.
When we pull back the arm of the catapult and stretch the rubber band, energy is stored. This stored energy is called potential energy.
Energy is like a special kind of power that can change from one form to another, but it never disappears.

Imagine you have a toy car at the top of a ramp. When the car is sitting at the top, it has stored-up energy called potential energy. It’s energy waiting to be used.
When you let the car go, that stored energy changes into a type of energy called kinetic energy, which makes the car zoom down the ramp.

The important part to remember is that all the energy the car had at the top doesn’t just disappear; it changes from one type of energy to another. It changed from potential energy to kinetic energy This is the conservation of energy. It means that energy cannot be created or destroyed, only transformed from one form to another.
It means energy is always saved and just moves or changes form.
So, in a catapult, potential energy is stored when you pull the arm back, then it changes into kinetic energy when the arm is released, and the payload is launched.
A catapult is a compound machine, which means it is a machine made up of two or more simple machines working together.
In our free printable lesson we talk more about catapults and simple machines. We have included a simple machines activity and several related mini-posters.
Assembling Our Catapult
Below are the instructions for assembling the catapult we created with our Xtool laser cutter.
You can purchase this catapult kit which includes the wooden pieces, rubber bands, and a launch bucket. We also include a card with a QR code where you will find step by step directions in a PDF.
- Gather the pieces needed to build the catapult.

2. Insert the three horizontal stabilizing pieces into the slots on one of the frame sides, as shown in this photo. The horizontal piece with the notch is the back of the catapult.

Step 3
Add the other frame side. Your catapult should look like this photo.

Step 4:
Add the horizontal piece at the top of each frame.


Step 5: Add the arm and rubber band.

Step 6: Attach the bottlecap to create the payload bucket. This step is optional. Put together the wooden payload pieces or launch mini-marshmallows, ping pong balls, or craft pom poms.
When launching the catapult, try using the three different angle pieces.


STEM Activities with the Catapult
Now, it’s time to test the payload weight and launch “angle” and the effect on distance traveled.
Download our printable lesson for instructions, data recording sheets, and much more! You can purchase our catapult kit in our store.
I hold a master’s degree in child development and early education and am working on a post-baccalaureate in biology. I spent 15 years working for a biotechnology company developing IT systems in DNA testing laboratories across the US. I taught K4 in a private school, homeschooled my children, and have taught on the mission field in southern Asia. For 4 years, I served on our state’s FIRST Lego League tournament Board and served as the Judging Director. I own thehomeschoolscientist and also write a regular science column for Homeschooling Today Magazine. You’ll also find my writings on the CTCMath blog. Through this site, I have authored over 50 math and science resources.