

Color Changing Flowers Experiment with Free Printable


In this captivating color changing flowers experiment, your children will explore the fascinating world of plant physiology and water absorption. This engaging hands-on activity involves placing white carnations in differently colored water and observing the mesmerizing transformation of the petals.
This is one of those activities that can be done with all ages, including preschool!
We will get to see how water moves through a plant’s “straw-like” system called capillary action. It’s like a journey for the water as it travels through the plant and helps it absorb and share water, kind of like how our bodies need water to stay healthy. So, it’s not just about colors changing; it’s also a fun way to learn about how plants drink water and share it with different parts of their “body.”

The Science Behind the Color Changing Flowers
The science behind the color changing flowers experiment is the capillary action in plants. Capillary action enables plants to work against gravity and move water from the soil into the leaves and stems (the vascular system) of the plant.
To understand capillary action, it’s important to understand the properties of water. Consider testing the properties of water as a follow-up to this activity.
Water not only provides hydration to plants but also helps maintain their structure. When water moves through the xylem, it creates internal pressure, allowing plants to stand tall and firm. Without capillary action, plants may become limp and wilted.
Capillary action is a fascinating phenomenon that involves the movement of liquids, like water, through narrow spaces, such as tiny tubes or porous materials. The driving forces behind capillary action are cohesive and adhesive forces.
You can read about cohesion and adhesion in this post we have on testing the properties. There are six simple activities that will help you and your children understand and “see” the cohesion and adhesion properties of water.
Cohesion simply means that water molecules like to stick to each other. This is caused by the slightly negative charge of the oxygen atom of one water molecule being attracted to the slightly positive charge of the hydrogen atoms of another water molecule.
When water encounters a narrow space like a thin tube, and the diameter is small enough, cohesive forces within the liquid, along with adhesive forces between the liquid and the container’s surface, come into play. This synergy surpasses the force of gravity, allowing water to move upward. It’s like a delicate balance of attractive forces that goes against water’s natural tendency to be pulled downward by gravity.
This is where capillary action comes into play. A plant has special tubes called xylem tubes. They are the plant’s special system for moving water from the ground all the way up to the leaves, As water is drawn into the xylem tubes, it adheres to the walls of these tubes due to adhesive forces. At the same time, cohesive forces cause water molecules to stick together, forming a continuous chain.
Now, envision this chain of water molecules moving upwards through the xylem. It’s like a collaborative effort, where each water molecule pulls the next one up, defying gravity. This process allows water to reach even the tallest parts of the plant.

Capillary action is like a superhero power for plants! It helps move water and all the good stuff they need from their roots to every part of their body. Capillary action is a plant’s special delivery system for water and nutrients from the soil.
This chromatography coffee filter activity is easy-prep and an effective way to help students see capillary action. Plus, you’ll have some pretty flowers to display!
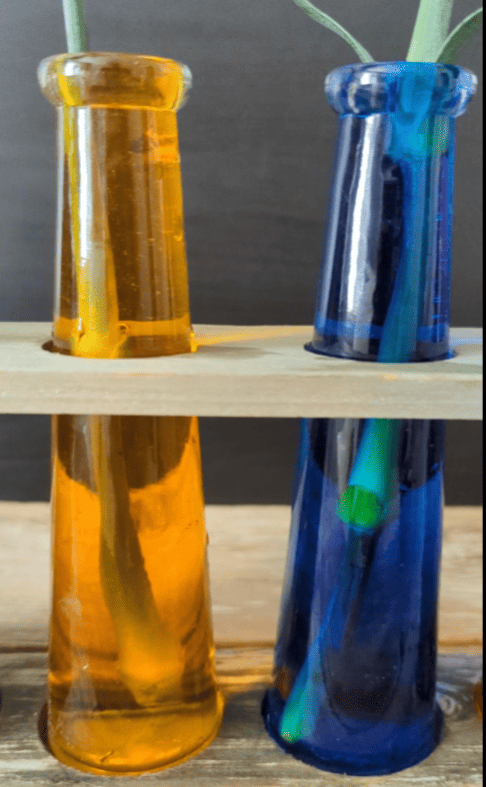
It’s hard for our children (and us) to see this capillary action, but the color-changing flowers experiment is a very visual representation of the process.
SPECIAL NOTE: I highly recommend leaving the stems longer. This will help your child see how the stem and leaves change color too.
Add Some Variations to the Color Changing Flowers Experiment
Here are some variations you can try on this activity:
- As an experiment, you could set up 2 parts to the experiment. Create two identical set-ups of flowers and colored water, however, the one variable you change is the length of the stem. Keep one set shorter and one set longer. Then, compare the time to see the coloring changing in the flowers.
- Where we live, the winter temperatures hover around 39 to 50 degrees Fahrenheit, if you are able to, place one set of flowers outside in about 40 degree weather and another set inside where it’s 68 or warmer. Did temperture affect the rate of absorption for the colors?
- You can also cut a slit in each stem and place one half in one color and the other half in a second color.
Get the Color Changing Flowers Lab Sheets
Please check your inbox, Promotions tab, or spam folder for an email from Thehomeschoolscientist.com. Don’t forget to add us to your address book so you don’t miss more of our free resources. Thank you!
Materials and Procedures for the Color Changing Flower Experiment
Materials Needed:
- 5 to 7 white carnations
- 5 to 7 vases or tall glasses
- Food coloring
- Spoon
- Pencil
- Worksheets we have created for this activity

Directions:
- Determine the colors you are going to use. Will you mix colors, such as red and blue to make purple? This is also a fun way for our youngest scientists to learn about mixing colors.
- Gather the flowers and cut off about 1/2 of an inch from the bott, cutting at an angle.
- Determine how much water you are going to pour into each jar or vase. Then, mix up a color for each vase.
- Fill each vase or glass with a colored water.
- Place one flower per vase.
- Record the starting point of your experiment on the recording sheet.
- Place the vases or glasses in a safe place where they can be observed. (We placed ours on our kitchen table and enjoyed them while we ate and schooled.)
- Watch the flowers over the next 4 to 7 days and use the questions and fun “lab sheets” to discuss and record what is happening to the flowers.
How long did it take to notice a slight tinge of color?


Take some photos of the flowers over the observation days.
Note where the water is in each vase at the start of the experiment. Ask some discussion questions:
- What do you think is going to happen to the level of water in the vase?
- If you think the water level is going to go down, where will the water go?
- This is a good time to talk about capillary action. Check out our printable with information and diagrams.
- Also notice the leaves and stem; watch them over the next few days too.

Check the water level after a few days. What happened?
What parts of the flower are changing color? Is it just the petals? Check out the entire length of the stem, leaves, and flower. Notice that our green also showed a border of yellow too!

More Capillary Action Activities
- Get Growing free printable – 50+ page printable covering plant life cycles, photosynthesis, capillary action, and more.
- Testing the Properties of Water
- Coffee filter painting
I hold a master’s degree in child development and early education and am working on a post-baccalaureate in biology. I spent 15 years working for a biotechnology company developing IT systems in DNA testing laboratories across the US. I taught K4 in a private school, homeschooled my children, and have taught on the mission field in southern Asia. For 4 years, I served on our state’s FIRST Lego League tournament Board and served as the Judging Director. I own thehomeschoolscientist and also write a regular science column for Homeschooling Today Magazine. You’ll also find my writings on the CTCMath blog. Through this site, I have authored over 50 math and science resources.